Lay out the braces where the scaffold is to be errected: Two(2) Horizontal Braces (yellow)
One(1) Plan Brace (red)


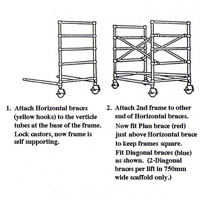
Stand one(1) base frame upright, lock the castors and attach the horizontal braces (yellow) to the vertical tube as shown. Repeat the proceedure with the second base frame then attach the plan brace (red) to square the unit.


Connect two(2) diagonal braces (blue) to either side of the structure and level unit by adjusting screw jacks. Note: 0.75m wide scaffold has one(1) diagonal brace (blue) per side.


Place a single platform in position at the 1.6m level.


Connect to each 1.6m upper frame the guard rail frame and stand up against the tower at each end.


Climb up onto the platform at 1.6m and then lift and place into position both frames. Now fit two(2) diagonal braces (blue) per side, within the 1.6m frames.


Standing on the platform at 1.6m, now install one(1) standard platform and one(1) safe-hatch platform at the 3.6m level.


Install the access ladder so that it protrudes through the safe hatch to the top of the guardrail.


Climb ladder and then fit guard rail bracing.


Install kick boards


If using the scaffold in an exposed area (outside) then the platform height should not exceed two(2) times the least base dimension. Outriggers can be attached to increase the base dimension, inturn allowing the platform to be raised accordingly.
Use single outriggers if working against a building or structure.


If using the scaffold in an sheltered area (inside) then the platform height should not exceed three(3) times the least base dimension. Outriggers can be attached to increase the base dimension, inturn allowing the platform to be raised accordingly.
Use double outriggers if working in an open area away from a building or structure.